
RETECHNOLOGY PREMIUM MARKETPLACE RELATED PRODUCTS | WEBINARS | SPECIAL OFFERS


You are viewing our site as an Agent, Switch Your View:
Agent | Broker Reset Filters to Default Back to List5 Keys to Choosing the Right Camera Equipment for Real Estate
October 01 2014
 As a real estate professional, you are a prodigious content producer responsible for a seemingly endless stream of pictures and videos. Though the cost of maintaining this production is significant, it is perceived as a necessary evil since the prospect of producing your own videos can be overwhelming.
However, video production is not as daunting as it once was, especially considering the technology available today. DSLRs have ushered in a content revolution in which 'professional' quality images are attainable even for the untrained. And post-production programs are more user friendly and affordable than ever. There is also an over-abundance of graphics, plugins, and templates on the web that are a veritable bounty to the amateur video producer.
And here's something more. You have already, unbeknownst to you, developed many of the skills that are fundamental to video production. This is because the fundamentals for video production are a) to know the basics, b) to pay attention to the details, and c) to own a few important tools. The same can be said for real estate: where would you be without your knowledge of the industry? Your attention to detail? Your phone, tablet or computer? In this way, the professional standards you have already established in your real estate career serve as a perfect foundation for video production.
So let's get started.
The first step to producing your own videos is getting your own equipment. As I stated here, you're better off in the long run to pay this initial cost than to continue paying overpriced production companies or underpriced, unreliable ones. Buying this equipment will cost you cash today, but will pay off tomorrow with every piece of content that you successfully produce by yourself, on your own schedule, for free.
You don't need anything fancy. You don't need tons of technical knowledge. You're just trying to make videos that look good and sound good.
Here are five pieces of equipment you're going to need, bearing in mind that the best equipment that you can buy is the equipment that works best for you:
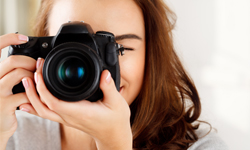
#1. A DSLR Camera
You get two uses out of a DSLR camera: professional-grade photography and professional-grade video. Here's the bare minimum of what you need in your camera:
- Resolution: To shoot your own video, you need a DSLR camera that shoots HD video, 1920×1080.
- ISO: The camera also needs to have a high ISO range—which affects how much light you can take a picture/video in. Basically, the higher the ISO range, the better your ability to shoot poorly lit spaces and still get a quality image.
- Brand: When it comes to brand, beauty is in the eye of the beholder. The name of your camera may make a difference to some people, but what really truly matters is how your camera feels in your hands and how comfortable you are with it.
- Feel: To me, shopping for cameras is akin to shopping for cars. You can know all the technical stuff and that's great, but what really matters is how you feel in the driver's seat with the wheel in your hands and your feet on the pedals. Of major importance when filming or taking pictures is whether the camera fits in your hands and whether you feel comfortable moving it and moving around with it.
#2: A Lens (or two, or three)
Start with a mid-range zoom lens, also known as a 'walkaround lens.' One of these 'walkaround' lenses (frequently the lens that will come in a package deal at a camera store) is versatile enough while you get comfortable with the camera. This lens gives you the flexibility to get a good wide shot or zoom in and get a detail shot without having to switch lenses.
If you plan on doing a lot of movement in your shots or zooming in a lot, make sure your lenses have image stabilization (IS). This keeps the lens from shaking too much, which again gives your images a professional quality.
If you plan on shooting details, get a 'normal' lens. This lens won't zoom, however, and that may be restrictive for a DIY videographer. I don't recommend starting with this lens. And finally, make sure to get a lens compatible with your DSLR brand.
#3: A Tripod
You may think you have steady hands, but you actually don't when you put a camera in them. Get a tripod and play it safe, as the tripod ensures a) stability of the image, and b) smoothness of your camera motion.
You don't need a very expensive one, but price does make a difference. The cheap tripods are rickety, and panning with one (moving the camera from side to side) or tilting (up or down) will look mechanical, shaky, and/or sloppy.
Try a tripod before you buy it. Loosen up some knobs at the top and move the tripod up to down, right to left, left to right, bottom left to top right, etc. You're looking for smooth motion and easy maneuverability. No hitches or stiffness.
I also suggest getting a tripod with an extendable head. Being able to just extend the top of the tripod to get additional height is very convenient when you don't feel like readjusting the entire thing.
#4: A Memory Card
Get the biggest memory card you can. Videos produced by DSLR cameras are quite large and take up a significant amount of space.
#5: Wireless microphones
If your video will have someone talking in it, you have to get a microphone. Built-in mics on DSLRs are not professional quality and the poor sound will turn a viewer off instantly. Wireless microphones capture good audio, are inconspicuous, portable and great for capturing voices and plug right into a DSLR camera with a standard microphone jack.
Here's my favorite wireless mic.
And there you go! While it is true that the more equipment you have, the better able you are to adjust to difficult situations, you also have to consider that you have to carry this stuff around and set it up, and then once you're done, take it all down and put it away, too. That takes considerable time, and for a busy real estate professional, minutes matter! That's why I recommend keeping your equipment to a minimum of what you know will get the job done and only shooting in well-lit spaces so you don't need any lights.
Stay tuned to the blog for more! Next time, I'll go through some fundamentals of production you'll need to know before you start making your own videos.
To view the original article, visit the Lone Wolf blog.