
RETECHNOLOGY PREMIUM MARKETPLACE RELATED PRODUCTS | WEBINARS | SPECIAL OFFERS


You are viewing our site as an Agent, Switch Your View:
Agent | Broker Reset Filters to Default Back to ListPhotos too large for upload? Take these simple steps to resize them.
June 09 2014
 Many Realtors® upload photos to their MLS and other real estate web sites. Photos that are taken at a high resolution (high quality) save as large files; sometimes, too large for upload to those web sites. We receive a lot of calls asking for assistance resizing photos when the file size is above the website’s limit. Below are simple steps for both Window and Mac users.
Windows Solution:
Use the Image Resizer for Windows, courtesy of CodePlex. This utility will allow you to safely and quickly resize your photos. Although designed for windows XP, I have been able to install this program on Windows XP, Windows Vista, Windows 7, and even Windows 8.
Here is how:
1. Go to the URL: https://imageresizer.codeplex.com/
2.Select the “DOWNLOADS” tab.
3. Halfway down the page, you will see a green icon and the words “Image Resizer.” click this Click on that hyperlink to begin downloading the utility.
4. You’ll be prompted to “RUN” it and “Agree to [their] Terms.” (Do so, and then give it a minute or so to complete the download.)
5. Then, in your files, select the photo you would like to resize. (You may also select multiple photos by holding the “Ctrl” key and left-clicking on different photos.)
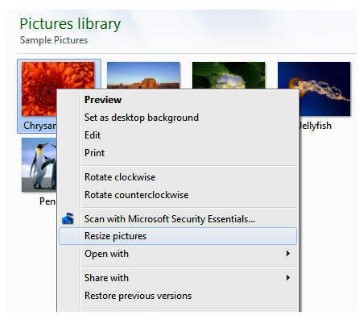
6.Once your photo(s) are selected, right click a photo and choose the “Resize Pictures” option from the menu box.
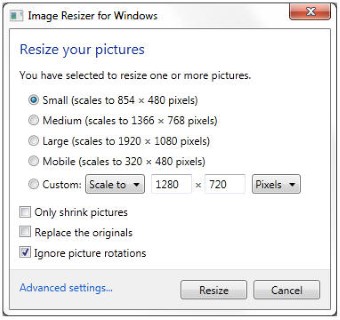
- Clicking on this option brings up a dialogue box that gives you the size options. You can choose the default Small to Large sizes, or make Custom sizes that fit your needs.
- You’ll also notice that there is a ‘Replace the Originals’ setting. I do no recommend this setting because, in my opinion, it is preferable to have both versions available: the smaller (lower quality) one and the larger (better quality) one, rather than having only the smaller (lower quality) photo.
Mac Solution:
Macs have a built in process for resizing. It’s a five step procedure using the Preview App on Mac OSX.
Here are the steps:
1. Select multiple pictures and open them using “Preview.”
2. Use the key combination “Command + A,” which will select all your photos.
3. Go to “Tools” and then “Adjust Size.”
4. On the window that comes up, you can choose what height and width you would like to make your photo.
5. Then,
- if you wish to replace the large (better quality) file with the smaller (lower quality) file, go to “Files> Save All.”
- if you wish to keep the large (better quality) file and the smaller (lower quality) file, go to “File>Export Selected Images” or “Save As.”
There you have it. And, as always, if you run into any complications, give us a call. We are always happy to help our subscribers.
To view the original article, visit the Tech Helpline blog.