RETECHNOLOGY PREMIUM MARKETPLACE RELATED PRODUCTS | WEBINARS | SPECIAL OFFERS


You are viewing our site as an Agent, Switch Your View:
Agent | Broker Reset Filters to Default Back to ListWant to Get a Professional Distortion on Your Listing Photos?
September 29 2010
 In my last post I discussed how you can adjust your camera setup to ensure perfectly vertical lines in your listing interior photos and I believe that the technique is essential for any real estate photographer. But what if you have photos that are already distorted, or you have no choice but to shoot from a position that results in a distorted photo?
Well, that’s simple. You digitally modify it to make it look perfect, of course.
Before I get into how to correct distortion, let’s quickly take a look at some terms and definitions:
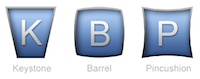
Keystone Distortion – when your photo has converging vertical lines that result from your camera being tilted downwards or upwards during the shoot. Although the lines converge, they will still be straight, showing no signs of bowing/curving.
Barrel Distortion – when the vertical and/or horizontal lines in your photo appear to be bowing outwards as if inflated. Typically results from using wide angle and fisheye lenses.
Pincushion Distortion – when the horizontal and/or vertical lines in your photo appear to be bowing inwards as if pinched. Typically results from fully “zoomed-in” telephoto lenses.
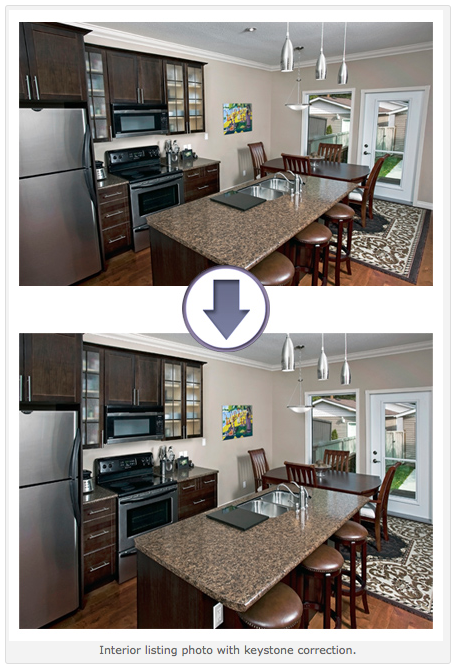
All right, now that we’re all pros at understanding what causes photographic distortion, let’s look at some ways you can correct it in Photoshop. If you remember this old post about lighting listing interiors, you’ll likely recognize the photo below. You also might remember how Sara Maclennan of edmonton-homes.ca kindly commented on my apparent keystone distortion.
Modifying verticals so that they’re parallel is not a complex edit in Photoshop, and like most edits there’s more than one way to do it. So, here are the two most common ways:
1) Distort
The distort function can be found from your main menu at this directory: Edit > Transform > Distort. If you can’t access it, it’s because the “background” layer is locked by default. What you need to do is create a free-floating layer that can be distorted. To do this, go to: Layer > Duplicate Layer. Once you have a free, unlocked layer, then activate the distort feature.
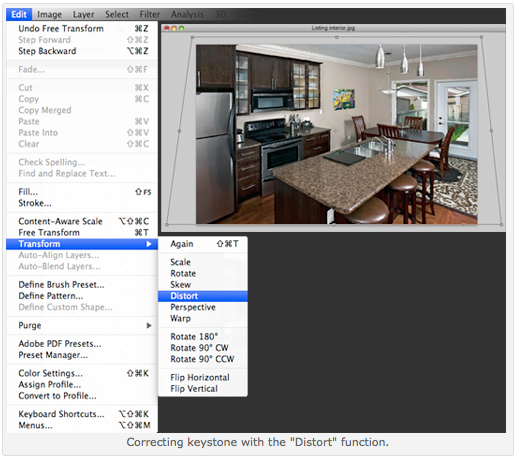
Essentially, what you are doing is pulling the corners of the photo outwards to counteract the keystone distortion. You may want to use guidelines to ensure that your vertical lines are parallel.
2) Lens Correction
The lens correction filter can be found here: Filter > Lens Correction in Photoshop CS5, here: Filter > Distort > Lens Correction in CS2 – CS4, and if memory serves me, was not available in previous versions.
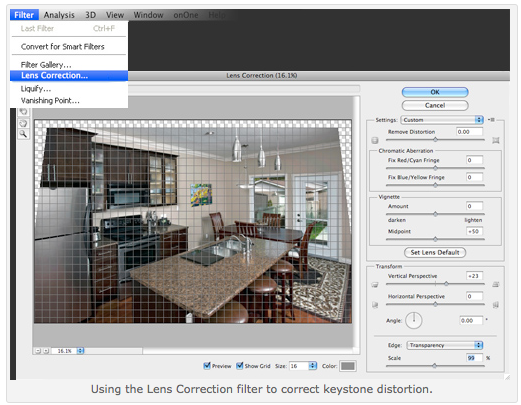
Using a grid overlay helps to determine when your verticals are parallel. You simply need to toggle the “Vertical Perspective” until your image looks squared off. Hit “OK” and then crop your image appropriately.
In my next post, I’ll discuss how to counteract barrel and pincushion distortion. Until then, happy edits!