RETECHNOLOGY PREMIUM MARKETPLACE RELATED PRODUCTS | WEBINARS | SPECIAL OFFERS


You are viewing our site as an Agent, Switch Your View:
Agent | Broker Reset Filters to Default Back to ListWant to Give Your Listing a Professional Touch? Focus on the Angles
September 27 2010
When shooting listing photos, or any architecture for that matter, you’ll find yourself dealing with lines, and lots of them. Unlike nature shots, urban structures are filled with perfectly straight horizontal and vertical lines, and understanding these lines is very important when shooting real estate photography.
The general standard for listing photos, especially interior shots, is to keep your vertical lines straight, while allowing the horizontal lines to create a sense of depth and perspective. Achieving perfectly vertical lines is not difficult if you know how to set up the shot. The trick is to keep your camera perfectly level, and elevated to about half the ceiling height. Here’s a diagram and test shot I performed earlier today:
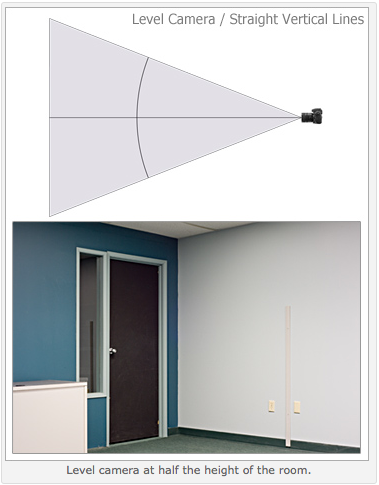
Use a tripod to level your camera and fine-tune the height. Most tripods have a built-in bubble level to assist with this process, but if you want to be certain that your settings are perfect, try using a hotshoe bubble level. Having the level on your camera as opposed to the tripod legs, means that your camera is level—not just the tripod. Tripod heads can tilt and pan which can easily throw off your camera even if the legs are set perfectly.
If you set your camera too high, you’ll notice the vertical lines will converge towards the bottom of the frame. The result is a slightly skewed and imbalanced look to the room. Here’s a sample:
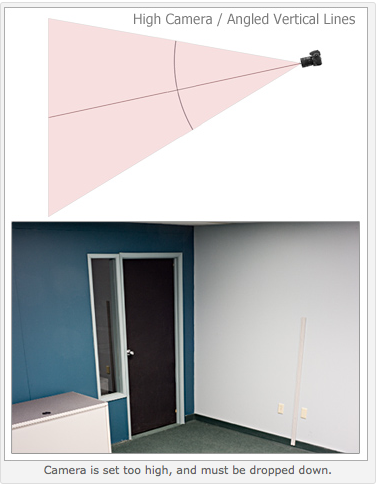
This “error” is common as people tend to shoot their cameras at eye-level. Eye-level is commonly much higher than the mid-height of a room.
Alternatively, the shot may be taken from too low. This “error” commonly results from shooting from one knee, or while seated in a chair. As you might expect, the lines converge towards the top of the frame. Here’s a sample:
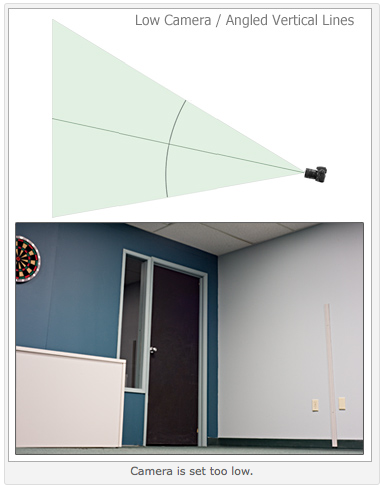
Again, the room feels skewed and unbalanced. Although this type of shot is less common for interior photos, it’s extremely common for exterior shots where the photographer is forced to stand beneath the mid-point of a structure. In other words, there’s not much you can do about it for exterior photos unless you want to shoot from further away.
Also note that the samples above were shot with a 50mm prime lens, which has no barrel/aspherical distortion. Wider lenses, especially fisheye lenses, will amplify the skewing of your vertical lines and may add curvature to straight lines. I’ll talk more about this problem in the next post.
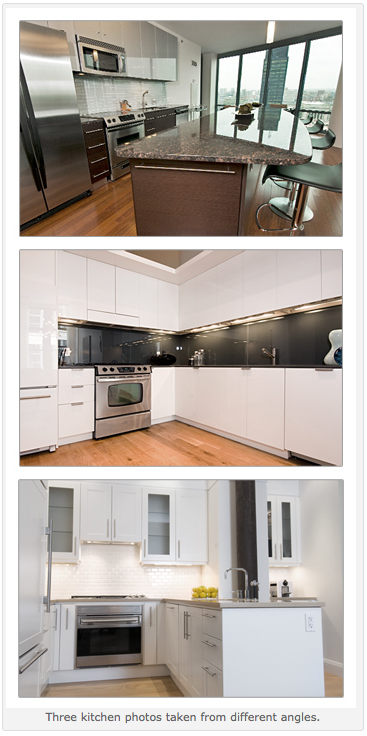
For now, have a peek at some “real world” examples, and have a peek at your own listing photos. You may notice that you have a tendency to to shoot too high. I know I did.
If you would like to read the original blog post. from the Point2 Agent Blog, please click here.