
RETECHNOLOGY PREMIUM MARKETPLACE RELATED PRODUCTS | WEBINARS | SPECIAL OFFERS


You are viewing our site as an Agent, Switch Your View:
Agent | Broker Reset Filters to Default Back to ListHow to Build your Neighborhood Database From Scratch
April 04 2022
 As a real estate agent, knowing who you are marketing to is essential. Luckily, there are many ways to get there, and each process is different based on your approach. Some may be obvious like your sphere of influence, past clients, or even a social media friend list. But did you know that creating a prospect list for any neighborhood is quick and precise with RPR?
In this article, we'll show you how to create a highly targeted list of homeowners for any geography that can be imported into your CRM to aid in future direct marketing efforts.
Use RPR to Build Your Database
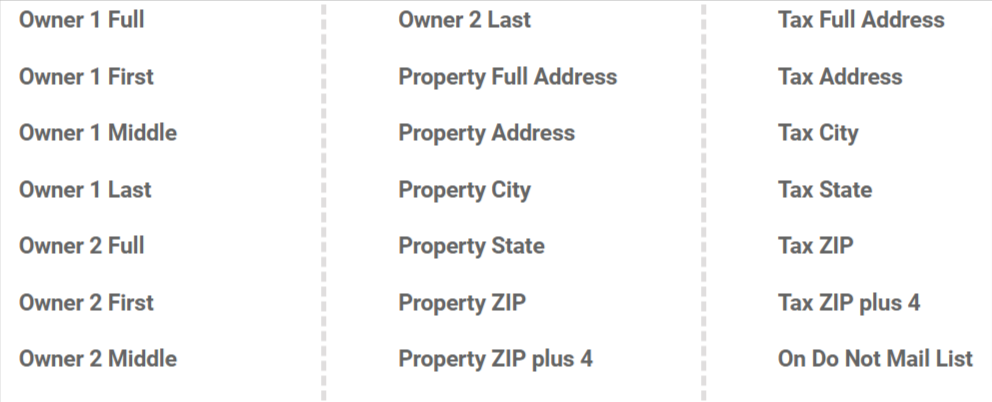
RPR's Mailing Labels feature also includes a CSV export, which provides REALTORS® the ability to create prospecting lists with up to 2,000 records (residential or commercial property owners) each month. That means with RPR you have the ability to export direct mail contact information to your CRM for any neighborhood. Here is an example of the general fields in each export:
Step by Step: Exporting Property Owner and Address Data
From the RPR homepage, select Research and choose Map Search. You'll arrive at the RPR map.
Now using the main search bar, change:
- TYPE/STATUS: Check Public Records
- PROPERTY TYPE: Select your preference here. For this example, we'll use Single Family.
Now enter the general geographic area in the LOCATION search field and then select the search button. The map will update. Now pan and zoom the map to find the neighborhood you're focusing on. Once you do, it's time to draw a boundary around the neighborhood.
Select Draw and choose Polygon (If you prefer, try one of the other options: Freehand, Radius, or Box).
Using your mouse, click on the map to begin creating your geographic area. Once you've connected the last point, a dialog will appear. Click Search this Area. Map pins will display on the map representing each home in the area.
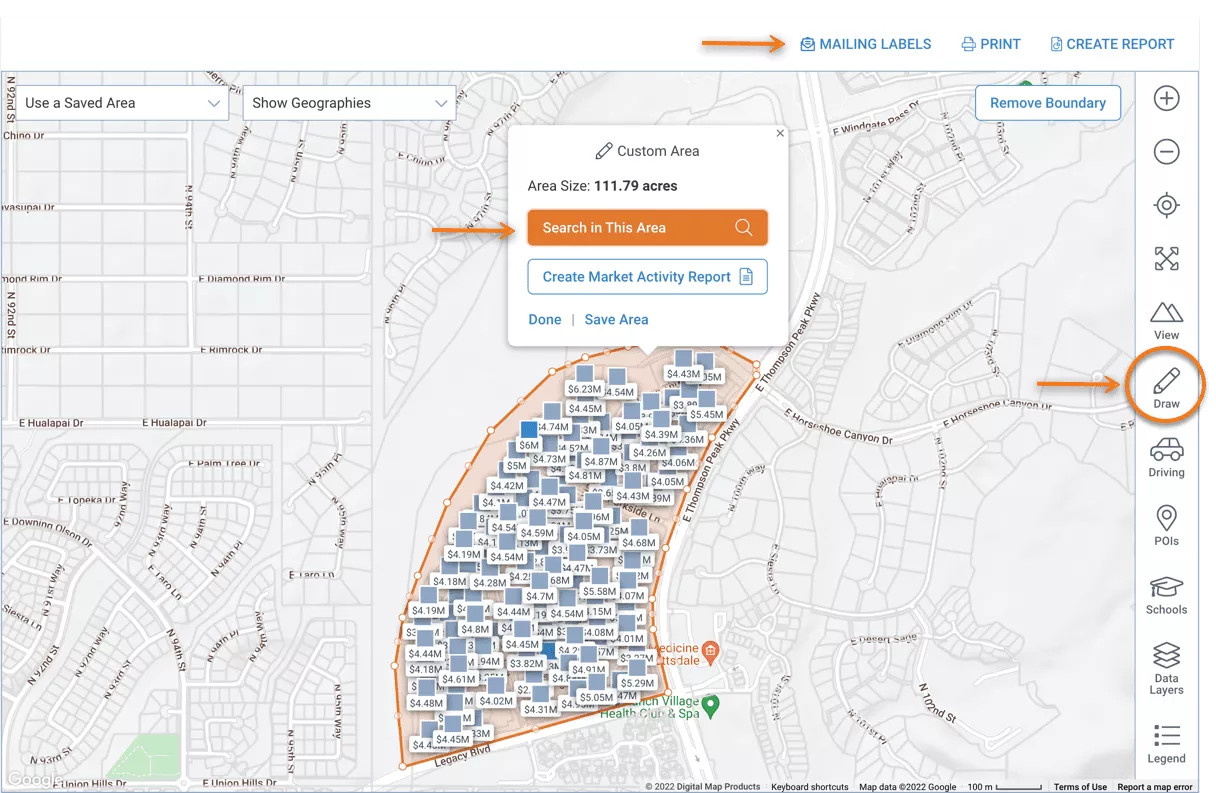
Now select the Mailing Labels button above the map.
The Mailing Labels dialog will open with three sections to complete.
LAYOUT:
Here we'll choose the CSV option because that will become the base file you'll import into your CRM.
CUSTOMIZE:
In this section, you'll choose the address and owner name format.
First select the Address Type: Property or Tax Billing. If you select Tax billing, you can also choose to Eliminate Duplicates.
Next choose how you want the labels addressed: Owner Name, Owner Name "and/or Current Resident," "Current Resident" and Custom Name. Since our goal is to populate a CRM database, let's check Owner Name.
FILTER:
In this section, you can filter contacts by occupancy type, Do Not Mail and those with incomplete addresses.
Begin by selecting Occupancy Type: All, Owner-Occupied & Absentee Owner. For this example, we'll choose All. Then using the spreadsheet, we can then look to the mailing and site address to identify absentee owners.
Now choose Export to generate your list.
Create prospecting lists with RPR
Collecting the names and addresses of homeowners you want to market to is pretty painless using the RPR Mailing Labels capability. Hopefully you were able to follow these steps and generate an exportable list for your geographic farm area.
Look for future articles on how you can use Google Sheets (or Excel) and RPR to augment your list with new fields of data.
To view the original article, visit the RPR blog.