
RETECHNOLOGY PREMIUM MARKETPLACE RELATED PRODUCTS | WEBINARS | SPECIAL OFFERS


You are viewing our site as an Agent, Switch Your View:
Agent | Broker Reset Filters to Default Back to ListFacebook Video Tips, Tricks, and Best Practices
April 19 2017
Creating video may not be easy, but it is absolutely worth it.
Video is important for several reasons:
1) Video lets you stay in touch with clients (and potential clients), which helps you to build relationships with those who you want to do business with.
2) Video helps to build your brand and brand awareness. It builds your credibility, your authority, and showcases your expertise. Build trust in your business by showing your character and confidence; video helps you to achieve both.
3) Many consumers prefer video; it is fun and easy, doesn't require reading, is more expressive, more personal, and a video can contain more information than a still photo.
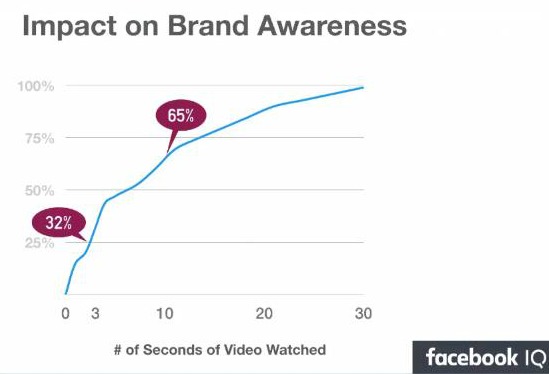
4) Studies show that viewing a video for only a couple of seconds can have a lasting impact on the viewer—increasing brand awareness and even positively impacting their intent to purchase.
5) Video has the power to differentiate your business from your competitors, especially if no one else in your niche is creating Facebook videos. You become the innovator!
6) Finally, Mark Zuckerberg, founder of Facebook, has already hinted that the future of his platform is video, and has predicted that within four years, all Facebook content will be in video format.
So how can you use it?
In this article we are going to talk about three Facebook Video features, practice and create a market stats video, and an exclusive resource for practicing your videos (where you can also receive continued guidance and feedback).
1. Three Facebook Video Features:
There are three main ways to use video on Facebook:
- Posting a video on Facebook
- Creating a slideshow
- Streaming a Facebook Live video
Posting a video on Facebook
You may already have a video on hand—a property tour video shot by a photographer or videographer, or perhaps you've filmed market updates on your phone, camera, or other media device. Now we'll show you how to share the video that you already have on a Facebook post.
Don't panic, this is easy, we promise.
How to post a video on Facebook:
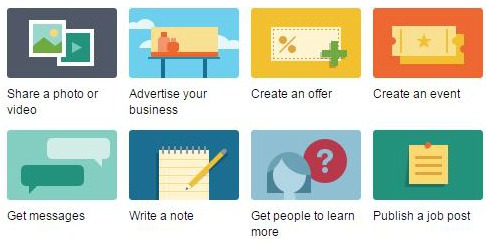
Go to your Facebook business page (as if you were going to post a status update) and click the Share a photo or video:
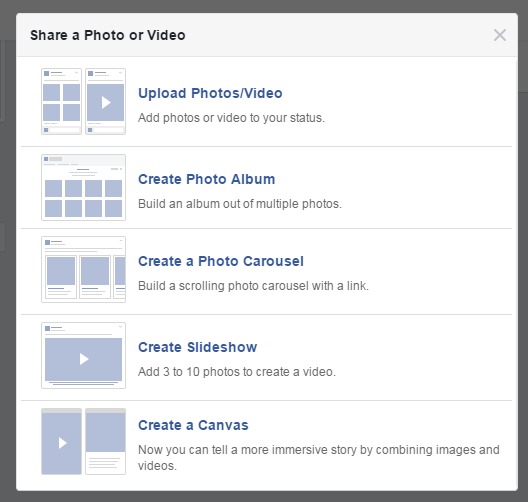
You will then be presented with a myriad of choices (right now, just click the Upload Photos/Videos, but we'll look at Create a Slideshow a little later in this article as well):
You can then upload the video from its location on your device:
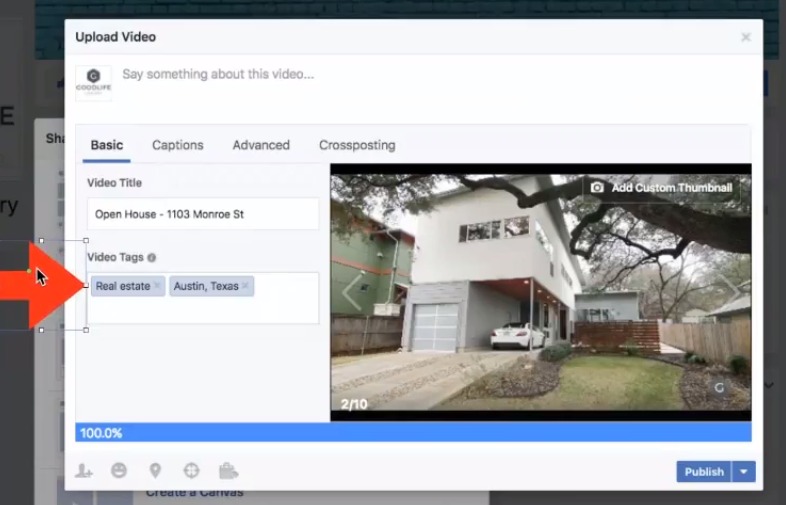
You will also see that we added two tags on this particular video, as well—one for real estate and the other relating to the property's location.
Adding video really is that simple. Now just press Publish and your video will be available on your business page.
But what if you don't already have video? How can you create a video?
You could hire someone (though that's pretty costly, but definitely something to consider for those properties with a higher price point).
Alternatively, you can use Facebook's Slideshow Video feature.
Facebook's Slideshow Video Feature
If you don't yet feel comfortable with the idea of creating your own video (maybe you're a bit camera shy), this is the perfect alternative. The Facebook Slideshow creation tool allows you to take a series of photographs and combine them into a slideshow, creating a video-like effect, even with some background music!
This is a slideshow video that Chris Scott, co-founder of The Paperless Agent, created for a Goodlife Realty listing:

How to create a Facebook Video Slideshow:
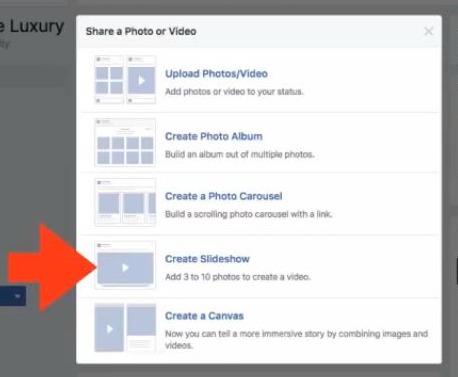
To create a Facebook Video Slideshow, go back to your Facebook business page (as if you were going to post an update) and, just as you did to upload a video, select Share a photo or video.
This time, though, click on the Create Slideshow option:
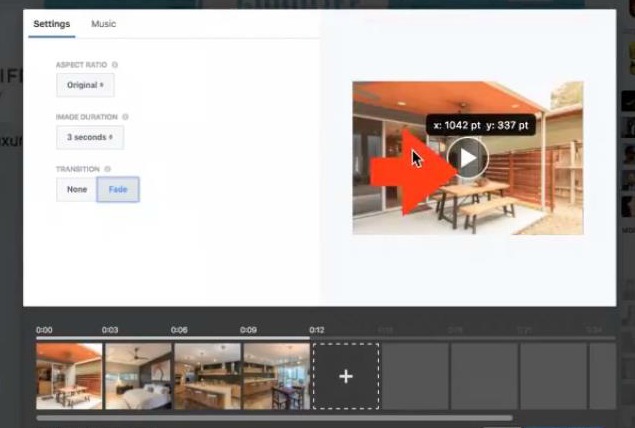
On the next page, click on the plus sign down near the bottom, which will allow you to add the photos you want to your presentation (either photos that are already on Facebook or upload photos).
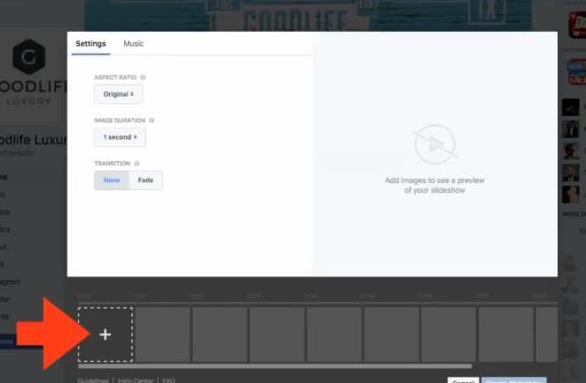
So far, you've added the photos—but you are not done yet! Facebook allows you to customize your video with image duration (2-3 seconds works well), transitions (none means a quick change, fade is a slower transition, which we prefer), and themed music.
Helpful Hint: to see what a particular transition or music selection looks like, tap on the "play" icon shown below to view how your video looks like at that given moment, based on your current selections.
Hit Publish and your video will be available to your followers.
**Now for an advanced feature:
Before you hit Publish, save your video as a draft. Now, go back into your publishing tools on your business page, and under Video Library (you will see this along the left of the screen), there are a few more features that can be added before posting:
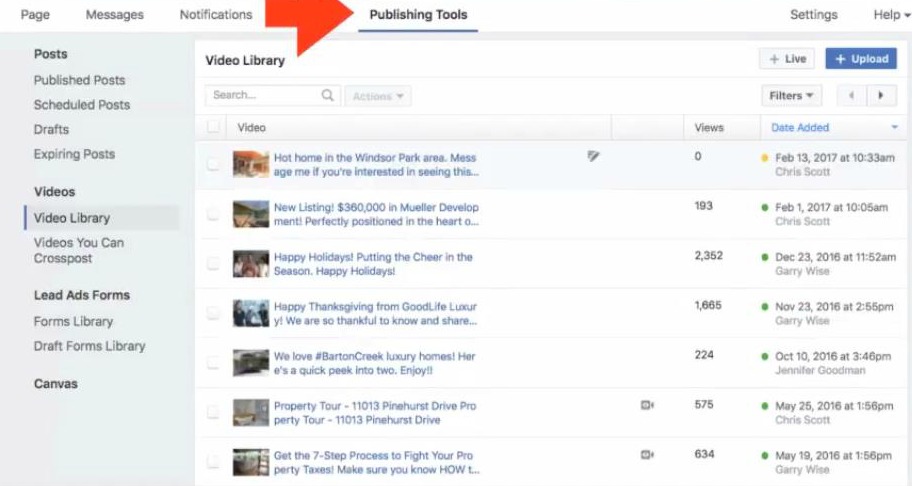
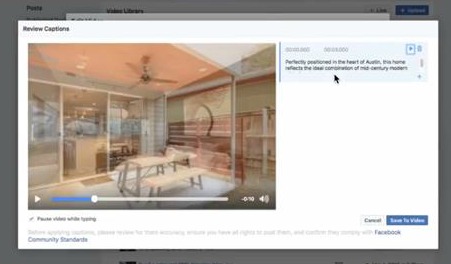
Here you can add video title, video tags, and captions.
The captions are very important. There is no sound in a Facebook newsfeed, but a reader can literally get info while they scroll down, without pressing play, just by viewing a caption.
Here's an example of how that would look in your potential clients' newsfeeds:
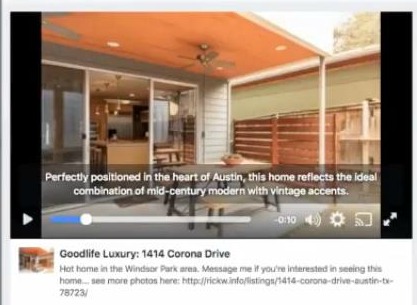
If that first frame and caption are compelling, a potential client will slow down long enough to read it and may even tap to view the video.
As important as the captions are, if this is the first time you are using this feature on Facebook, then start out with a basic slideshow and publish it. Later on, take a look at the advanced features.
Facebook Live
This is a live, as it happens, video streamed via Facebook, which stays on your Facebook page (unless you delete it, of course) so that you followers can watch it later.
Even if you don't get many people watching live, posting to your page after the fact gives many more people the opportunity to watch it later.
Facebook Live is a fantastic tool for recording a property tour; see how well this worked for us at GoodLife Realty:
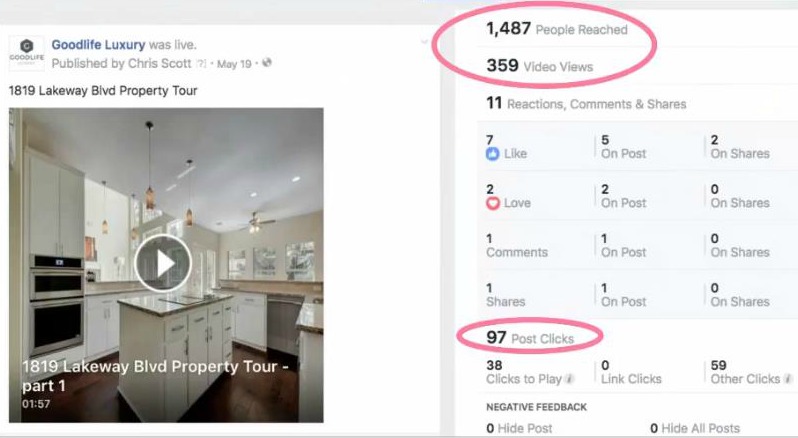
Almost 360 people watched this video and of those, 97 people clicked through to the Property Landing Page to find out more information about this particular property.
How to Facebook Live:
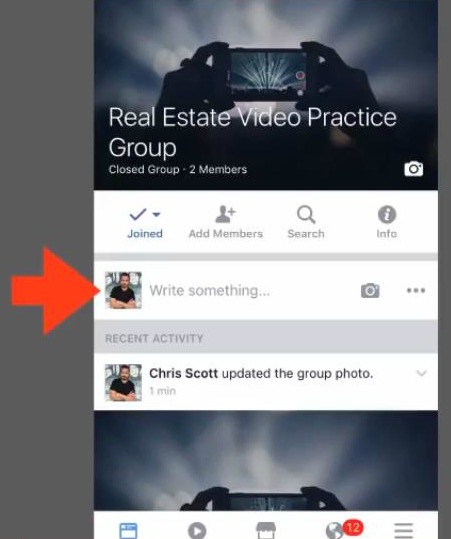
First, from your device, click Write Something (as below):
Then it will open a dialogue box like this:
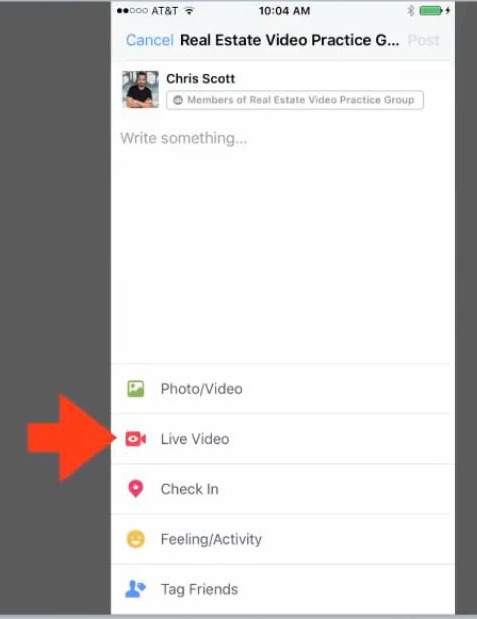
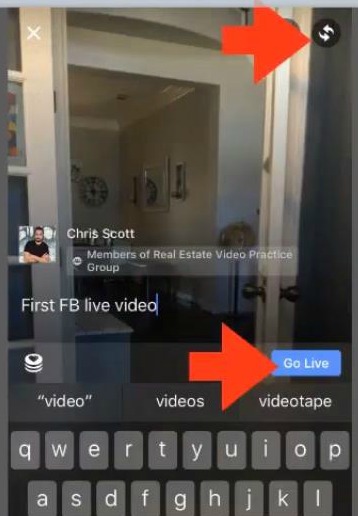
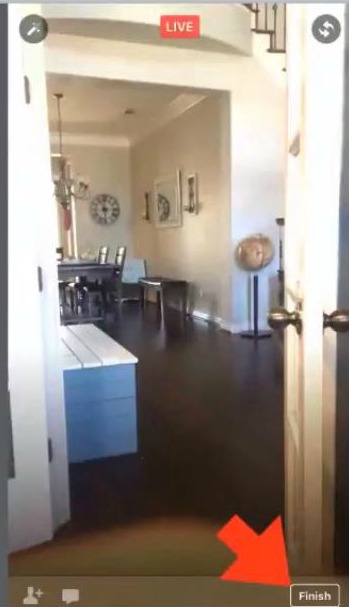
Tap Live Video, and you will see your screen come up, allowing you to put in a description (where you will see Chris typed in "First FB live video" below). The top arrow selects either your front or back camera.
When you are ready, only when you are ready (sorted out setting, lighting, etc.), should you click the blue Go Live button.
Facebook will do a short countdown and then you will be live!
Remember to hold your device horizontally because the landscape view looks much better.
You will know that you're live because your screen will say Live in a red box at the top. When you are finished, click Finish and then Post to share the video with followers on your page who weren't able to watch live.
2. Practice and create a market stats video
Even if you haven't done a video before, you can absolutely make a market update video with simple equipment.
These are the same steps you would use to prepare to give a talk. In fact, there is a high correlation between public speaking and making a video (so really, we are sharing two skillsets here!).
a) Write a script that you can read on video:
This might take a while, while you research and then type up a script of exactly what you want to say. It may seem like a lot of work, and it is, but your level of effort makes a difference. It's the difference between showing up with confidence as a market authority versus mumbling along because you don't really know what you want to say.
The question your potential clients are asking: "Is that agent good at their job?"
Your video needs to tell them a resounding yes!
b) Practice reading your script while recording video with your phone or camera.
This is literally reading right from the script that you wrote. Many people don't like to practice a new skill or they don't want to spend a lot of time perfecting that skill, but as with everything we do in life, we get better when we practice, so don't assume you're going to jump onto a video just once and it will be perfect.
Chris Scott, president of Goodlife Realty, co-founder of The Paperless Agent and a seasoned marketer, spends many hours each week re-watching video presentations to see how he can do better, preparing, and developing presentations because he knows it will make a difference to his viewers.
There are two main reasons to record this first version of a video:
First of all, it gives you a benchmark: something to watch and improve upon.
Second of all, while reading out loud with the stress of the camera and the mic, you will actually retain some of that information that you want to speak about, and it will be easier to read the next time around.
Three camera tips:
- Make sure it's bright, but not shining into lens. You don't need fancy expensive lights, but they do need to be bright. Alternatively, take your presentation outside to record!
- Hold your camera horizontally to get a landscape view.
- Smile and overemphasize a little more than you would in a normal conversation.
c) Watch the Video
It may be (really) hard to review your very first video (it doesn't get any easier, to be honest), but just watch yourself and pay attention to what you liked and what you didn't like; what worked and what didn't work.
d) Repeat Recording Video
The only thing that changes between this "second take" is that instead of reading from your script, you are only going to use it as a reference, summarizing your script from memory.
What happens when you do that?
You leave out unnecessary detail that, really, was just going to confuse your viewers anyway. A well-summarized script actually says to your audience, "Here is what this means for you." It's your interpretation of the stats or information.
Statistics may be important but, ultimately, your potential clients just want to know that info affects them.
e) Watch the Video
What would you change? What did you notice? What worked well? What didn't?
f) Repeat step #4:
This will be your third take, making you so much more familiar with your script and the process, and you start to feel a whole lot more comfortable.
You will see that you've gone through a huge curve that you overcame. Don't be tempted to use one version; you don't want to be known by that version. This requires a higher level of attention and detail.
3. Resources for practicing video
The one thing you definitely don't want to do is post your first-edition recorded video, or your first Facebook Live video in a forum where potential clients (and current clients) will see it!

We've set up a Facebook group exclusively for members of our Paperless Agent Coaching Club as a safe place to practice and post videos. It's a closed group of about 400 members who are all real estate professionals that we work with through the Paperless Agent Coaching Club.
Video may be a steep learning curve, but it gives one of the highest returns on investment of any digital marketing tool, so this is one skill you will want to practice.
Lights, cameras, action!
To view the original article, visit the Paperless Agent blog.